Introduction
This section is a detailed tutorial indicating how to customize the Cxx Designer generator. The goal of this example is to handle stereotyped classes to generate specific code.
The customization happens over five stages:
-
Defining a new stereotype «CxxCustomClass» in the project, available on Classes.
-
Creating a new custom variant.
-
Adding a new product file, to allow generation on stereotyped classes.
-
Writing a custom ACT to generate new code for this element.
-
Installing the new variant in the project.
Creating a variant
To create a new variant, you only have to copy the structure of the standard variant directory, found in your project’s resources.

The "init.py" file is mandatory in the main variant’s directory, as well as in the "acts" directory, in order to make python act available to the engine. If this file is missing, your python ACT won’t be loaded.
The description file must be updated to indicate what your custom variant does.
Name the copied variant "CustomVariant". For now, remove all content from the "acts" and "types" directories, and open the "products" directory.
Defining a new product
Our new stereotype is available on Classes, that is to say we have to edit the "Class.py" product file.
All we have to do is add a new generation task when an element has the «CxxCustomClass» stereotype.
# Product definition for Class
# Bound variables:
#   PRODUCT  the product being build
#   ELT      the element to generate

import act
from java.util import ArrayList
from com.modeliosoft.modelio.api.mda.model import ObUtils

if (CXX.isCxxElement(ELT) and not act.isNoCode(ELT)):
    # headerFile = CXX.makeNamespacePath(ELT) + "/" + CXX.makeCxxName(ELT) + "." + CXX.makeHeaderFileExtension(ELT)
    headerFile = CXX.makeDefaultHeaderFilePath(ELT)

    # bodyFile = CXX.makeNamespacePath(ELT) + "/" + CXX.makeCxxName(ELT) + "." + CXX.makeBodyFileExtension(ELT)
    bodyFile   = CXX.makeDefaultBodyFilePath(ELT)

    files = ArrayList()
    if (ELT.isStereotyped("CxxCustomClass")):
        PRODUCT.addFileGeneration(ELT, files, "CustomClassGen")
    else:
        if (act.isExternal(ELT)):
            if (ObUtils.isTagged (ELT, "Cxx.GenerateHeaderFile")):
                files.add(headerFile)
        else:
            files.add(headerFile)
            files.add(bodyFile)
        PRODUCT.addFileGeneration(ELT, files, "standard.ClassGen")
The new product file launches a generation using a new ACT, "CustomClassGen", when the current class is stereotyped «CxxCustomClass». Otherwise, the standard ACT, "ClassGen" is applied.
Using "standard.ClassGen" means the generator will take the "ClassGen" ACT from the standard variant. It is slightly different from entering only "ClassGen", which would search an ACT with this name in the current variant before launching the standard one.
We now have to add the new ACT called from this product.
Defining a new python ACT
In the "acts" directory of the custom variant, just add a new file called CustomClassGen.py.
Here is a sample showing the content of this file:
#
# Template CustomClassGen
#
from com.modeliosoft.modelio.cxxdesigner.engine.act import IAct
from com.modeliosoft.modelio.api.model import *
from com.modeliosoft.modelio.api.mda.model import ObUtils
import act

class CustomClassGen (IAct):

    ################################################################################
    # Generation code
    #
    def run(self, ctx, el):
        hxx = ctx.getOutputs()[0]
        cxx = ctx.getOutputs()[1]

        hxx.println("// Write custom code for the header here")

        cxx.println("// Write custom code for the header here")
It is usually a better idea to modify an existing ACT rather than to create a new one from scratch.
The variant will be ready to use as soon as it has been declared in your Modelio project.
Declaring the variant
Open the Cxx project’s edition box, and select the generation tab.

We have to select the variant in this tab, but this isn’t available right now.
Open the variant management box, in the upper right corner.
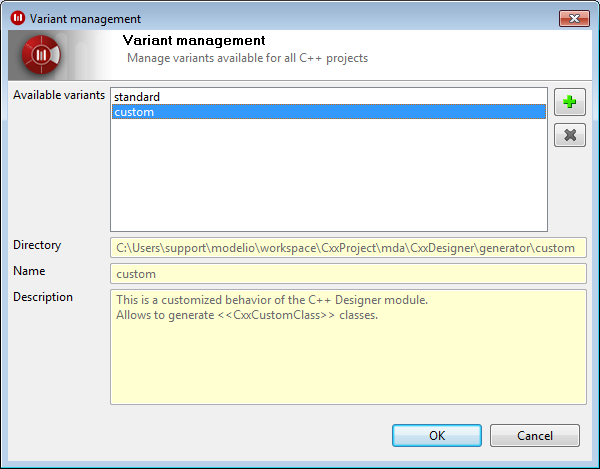
Add a new variant, and select the directory corresponding to "CustomVariant".
Here it is, the variant is available in your project. Once selected, it will be usable for the Cxx generation.