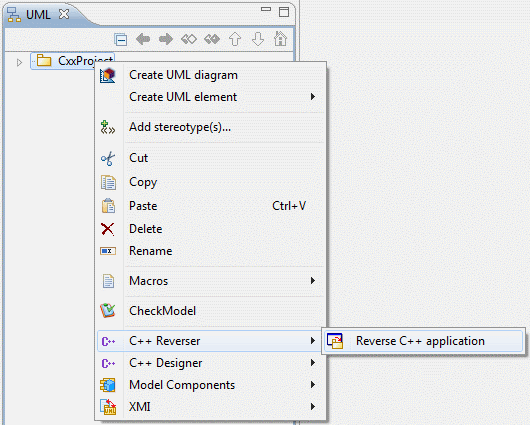
Launching the Reverse command
The first step in the Cxx reverse procedure is to select the model root and run the actual reverse command from the context menu.
The "Cxx Reverse" window
After running the "Reverse Cxx application" command, the "Cxx Reverse" window then appears. This window is used to:
-
Select the files to be reversed
-
Define Cxx reverse options
Selecting the files to be reversed
The first window to appear when the "Reverse application" command is launched is used to select the files you wish to reverse.
This window contains three zones:
-
a zone used to select the files and directories that you wish to reverse from
-
a zone where you can select all the files you wish to reverse by checking them, and ignore the others
-
a zone used to filter the file extension you’re using for body and header files
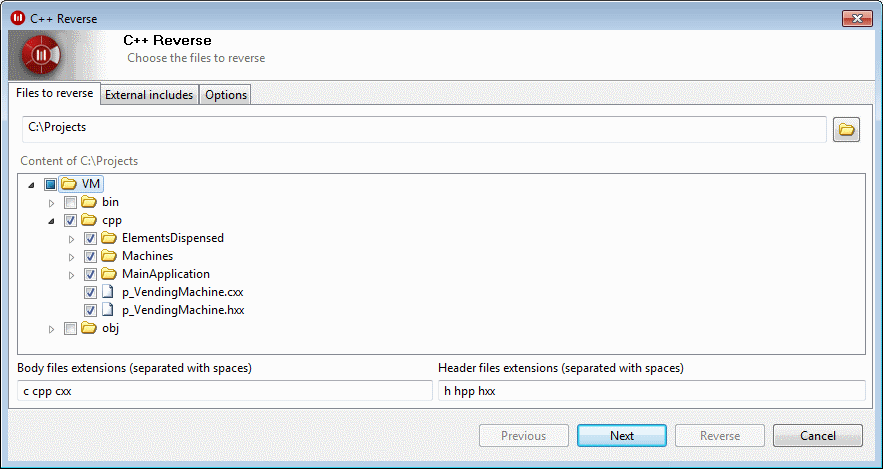
Steps:
-
In the top zone, indicate the directory you want to reverse from.
The "content" zone refreshes automatically to display the files in this directory. -
Change the body or header extensions if they don’t match those from your project to reverse. Select "cpp" files to reverse a complete application.
".h" is sufficient to carry out a structural reverse of a library. -
Check the files or directory to be reversed.
-
Click on "Next" to continue.
Defining the includes
The second "Cxx Reverse" window, which appears after you click on "Next" in the first window, is used to select any files or directories inside which you want to search for included files. These files will not be reversed.
This window contains two zones:
-
a toolbar to add files and directory, and manage the existing ones
-
a zone showing all included files and directories

Steps:
-
Click on the add directory button.
-
In the directory chooser, select the directory to include, for example the include path from Visual Studio.
-
Press OK.
-
Click on the "Next" button to continue.
Defining reverse options
The third and final "Cxx Reverse" window, which appears after you click on "Next" in the second window, is used to define the various options used during reverse operations.
This window contains two zones:
-
A zone used to select the granularity of the reverse (the "Granularity" zone). Available granularities are "Complete", "Complete structure" and "Simple structure". For further information on granularities, see "Reverse modes".
-
A zone used to enter macros passed to the pre-processor, before carrying out the reverse (the "Macro definition" zone). Files are reversed after pre-processing.
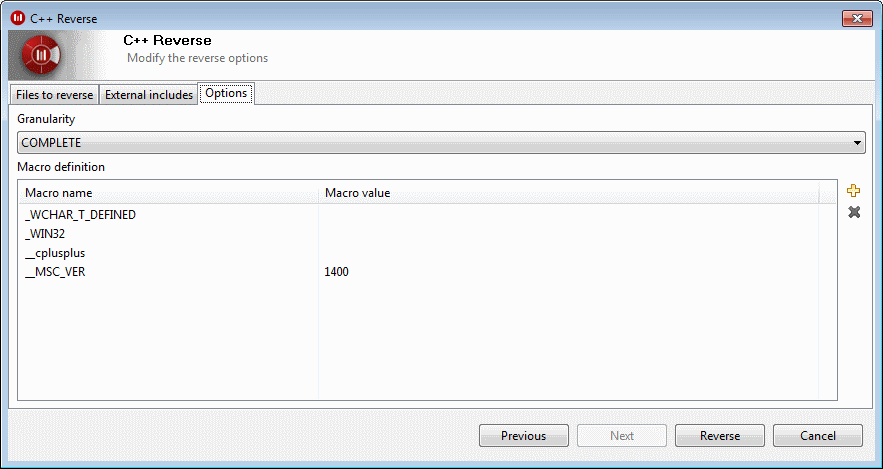
Steps:
-
Select a granularity from those available in the dropdown list.
-
Define any macros you wish to use.
-
Click on "Reverse" to start the reverse.
Reverse reports
After the reverse operation has been completed, a window named "Report of the reverse" appears. This window provides you with information on the reverse operation, as well as indicating any errors which were encountered.
-
Lines simply providing you with information are preceded by the
 icon.
icon. -
Warnings are preceded by the
 icon.
icon. -
Errors are preceded by the
 icon.
icon.