Creating the "Create a test case" command:
-
Go to
 "gui" /
  "commands"
 -
Right-click on
"commands", and select  "Modelio Studio" –>
  "Command"
 -
In the "Command identification" dialog box:
-
Enter "Create a test case" as label
-
Tooltip: leave blank
-
Id: leave the pre-filled value
-
Click Next
-
In the "Command behavior" dialog box:
-
Action: Select "Execute a java command"
-
Java class: Enter the following text: "CreateTestCase"
-
Parameters : leave blank
-
Can be applied on : Click on the
 button. A new entry appears with "ModelElement" as default value.
 -
Change the value to "Class".

After creating the command, the "CreateTestCase" class is created in:
 implementation /
  java /
  org.sample.junit / handlers / commands /
  CreateTestCase
Adding the command to the contextual menu
-
Go to
"gui" /  "contextual menu"
 -
Double clic on
"contextual menu" -
Go to the Modelio Studio tab.
-
In the left-hand list, select the "Create a test case" command
-
Click on the
 button
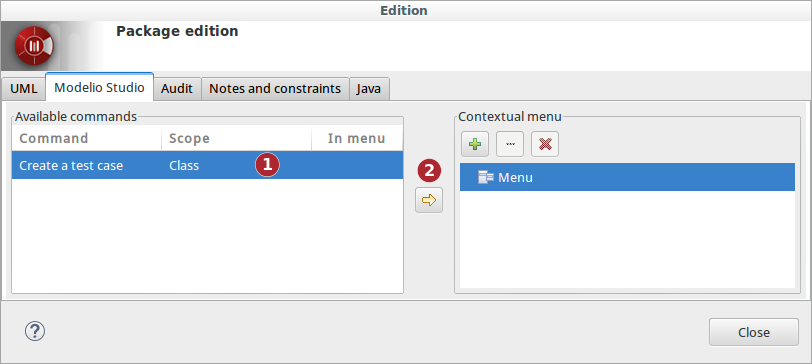
-
A green check mark (
 ) appears next to the "Create a test case" command in the left-hand list.
Writing command method
The next thing we have to do now is to complete the methods actionPerformed() and accept() with their implementation code.
A bit of theory: Contextual command filtering and graying
Following the steps to complete the methods:
-
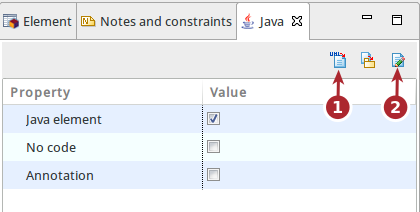
Select the following class:
implementation / java / org.sample.junit / handlers / commands / CreateTestCase -
In the Java Property view tab, run the generate Java source (1) and edit (2)
-
Update the
acceptmethod.
The accept() method is called to validate the availability of the command in the current selection context. The current selection context is simply passed as the list of the currently selected elements.
For our example, let’s consider that the command accepts only one selected element.
  1
2
3
4
5
6
7
8
9
10
11
12
13
14

      public class CreateTestCase extends DefaultModuleCommandHandler {
    ...
        public boolean accept(List<MObject> selectedElements, IModule module) {
            // Generated call to the super method will check the scope conditions defined in Studio.
            // Do not remove this call unless you need to take full control on the checks to be carried out.
            // However you can safely extends the checked conditions by adding custom code.
            if (super.accept(selectedElements, module) == false) {
                return false;
            }
            // Check that there is only one selected element
            return selectedElements.size() == 1;
        }
    ...
    }
-
Update the
actionPerformedmethod.
The actionPerformed() method is called when the command is activated by the end-user. Its role is to perform the proper action. Thus, the code of this method is the action itself.
  1
2
3
4
5
6
7
8
9

      public class CreateTestCase extends DefaultModuleCommandHandler {
    ...
        public void actionPerformed(List<MObject> selectedElements, IModule module) {
            Class classToTest = (Class) selectedElements.get(0);
            TestCaseCreator testCaseCreator = new TestCaseCreator();
            testCaseCreator.createTestCase(classToTest, module);
        }
    ...
    }
-
Add the following import:
  1

  import org.modelio.metamodel.uml.statik.Class;