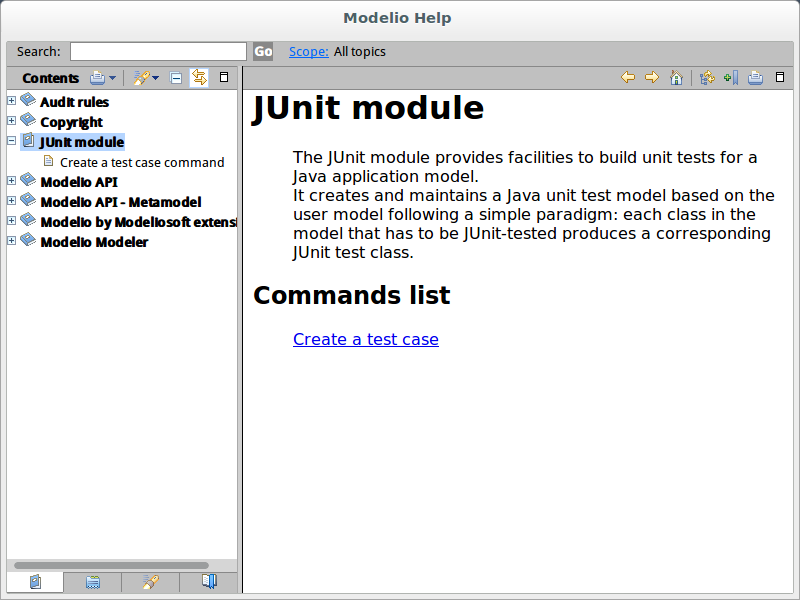
The user manual documentation is automatically built and embedded in the module by Studio.
At runtime, it is integrated to the Modelio help, along with its Index, search engine, and table of contents.
The module documentation workspace is in the ${ModuleProductionPath}/src/main/doc directory (where ‘${ModuleProductionPath}’ is the full path to the module production path). The documentation directory can also be browsed in the Eclipse SDK: junit / src / main / doc
Directory structure
The documentation is composed of html files. They are stored in the html directory (1).
The table of content is stored in the ‘tocs’ directory (3).
The documentations in other languages must be stored in the nl/$\{target.nl} directory, where ‘$\{target.nl}’ is the two-letter code of the target language. (2).
The two-letter code is defined by the ISO 639-1 standard.

Update the user manual documentation
For the JUnit module example, the ‘index.html’ file will be updated and an new ‘create_test_case_command.html’ file will be create.
-
Update the ‘html/Index.html’ file with the following content:
  1
2
3
4
5
6
7
8
9
10
11
12
13
14
15
16
17

      <html xmlns="http://www.w3.org/1999/xhtml" xml:lang="en">
    <head>
        <title>JUnit</title>
    </head>
    <body>
        <h1>JUnit module</h1>
            <ul>
            The JUnit module provides facilities to build unit tests for a Java application model.<br/>
            It creates and maintains a Java unit test model based on the user model following a simple paradigm: each class in the model that has to be JUnit-tested produces a corresponding JUnit test class.
            </ul>
        <h2>Commands list</h2>
        <ul>
            <a href="create_test_case_command.html">Create a test case</a></li>
        </ul>

    </body>
    </html>
-
Create a new ‘html file’: ‘html/create_test_case_command.html’
-
Add the following content to the ‘html/create_test_case_command.html’ file:
1
2
3
4
5
6
7
8
9
10
11
12
<html xmlns="http://www.w3.org/1999/xhtml" xml:lang="en">
<head>
<title>JUnit - create a test case</title>
</head>
<body>
<h1>Create a test case command</h1>
<ul>
On the class, use the following command to create a class test:<br/>
Right-click on the class to open the contextual menu, then select JUnit -> create a test case
</ul>
</body>
</html>
-
Update the ‘tocs/module_toc.xml’ file with the following content:
  1
2
3
4
5
6

      <?xml version="1.0" encoding="UTF-8"?>
    <?NLS TYPE="org.eclipse.help.toc"?>

    <toc label="JUnit module" topic="html/Index.html">
        <topic href="html/create_test_case_command.html" label="Create a test case command"/>
    </toc>
-
Delete the ‘nl/fr’ directory.
-
In Modelio, open the JUnit_sample project
-
Build the JUnit module
Right-click on JUnit to open its contextual menu then select the following command:
Modelio Studio –>  Generate/Package module
 -
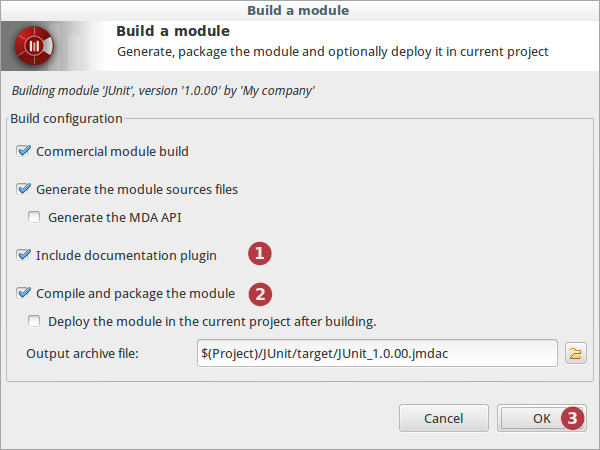
In the ‘Build a module' dialog box
-
Don’t forget to check "Include documentation plugin" (1) and "Compile and package the module" (2)
-
Click on "OK"
-
-
Deploy the JUnit module in a test project
-
Open the on-line help: go to the ‘help’ menu –>‘ help'