A workflow is a diagram with states and transitions (see the concepts section).
A workflow can only be created on a Package or a Component.
To create a workflow, select a Package or a Component then run the "  Workflow > Create a workflow…" command:
-
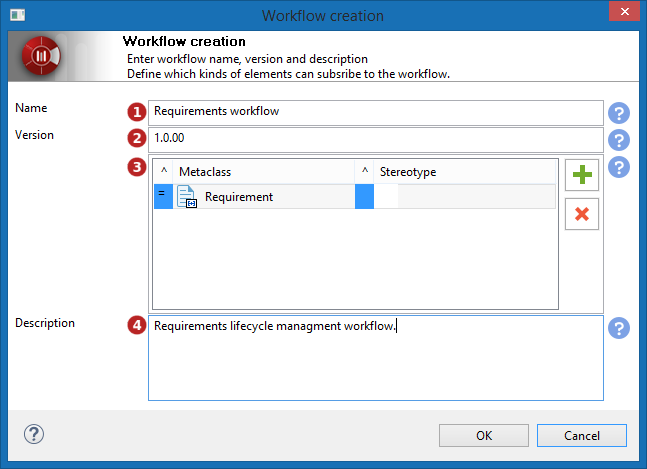
Enter the workflow name. Allowed characters: 'a' à 'z', 'A' à 'Z', '0' à '9', '.', '_' and ' '.
-
Enter the workflow version in V.R.C format.
-
Add the types of elements which can be enrolled in the workflow:
-
The '^' option is used to defined whether the workflow can be applied to the metaclass only or also to its sub-metaclasses.
-
The 'Metaclass' field is used to define the metaclass (element type) the workflow can apply to.
-
The '^' option is used to defined whether the workflow can be applied to the stereotype only or also to its sub-stereotype.
-
The 'Stereotype' field is used to define the stereotype the workflow can apply to.
-
-
Enter the workflow description.
-
Click on 'OK'.
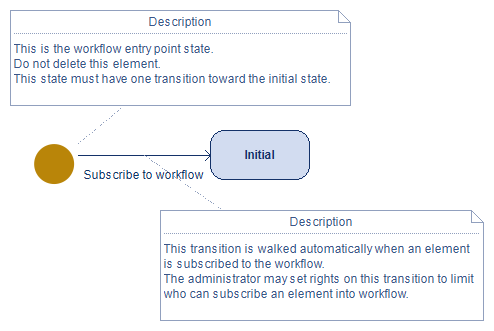
Upon creating the workflow, Modelio generates a workflow diagram which contains a pseudo state and an initial state. These states are essential for the proper functioning of the workflow: when an element is enrolled, it goes to 'Initial' state.
To complete the diagram, just create the desired states and transitions, and end the workflow with a final state:

-
Diagram palette: where to pick elements to create.
-
Transition : the transition name must be relevant (i.e. recall the action or condition allowing the state change). It’s recommended to add a description via the Workflow property view .
-
State: the state name has to be unique in the workflow. It’s recommended to add a description via the Workflow property view .
-
Final state: this state completes the workflow.