Introduction
To implement an application, application behaviour has to be described and implemented by attaching Cxx code notes to UML operations.
Entering operations code
Modelio Cxx Designer conveniently lets you input Cxx code for UML operations directly in the operation edition dialog box. You simply enter your Cxx code in the "Note Content" field of the "Operation Code" tab of the operation edition box. Modelio Cxx Designer injects code entered in this field into the operation definition and generates the markers required to retrieve the code back into the model, if it is modified in the external editor.
As an example, we want to implement the assignment operator for the "Task" class in our application. For this, we open the Cxx edition dialog box for the respective UML operation and input the operator code in the "Code" field.
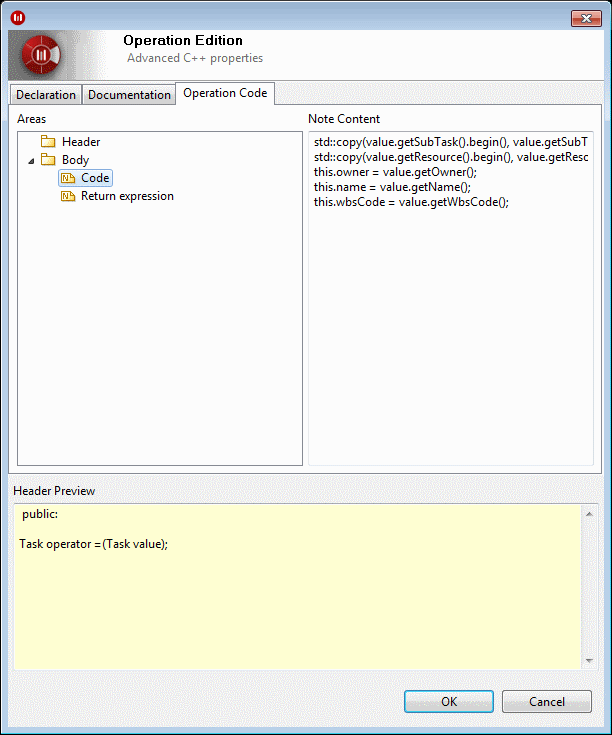
The entered code is injected into the definition of the assignment operator in the body of the "Task" class.
The "Return expression" field is used to input a return expression, which is always generated for the function independently of the function code. In our example, the standard return expression for assignment operators is input here. This note is generated automatically by the model-level creation operation pattern.
The "Base Constructor Code" field is used to input base construction clauses. Modelio Cxx Designer automatically activates this field if the operation is detected as being a constructor (as a result of its name matching the owner class name or of the attached «create» stereotype).
Here is the generated code for this class:
//class header file
#include "MyPlanner/TaskManagement/Task.h"

namespace MyPlanner
{
    namespace TaskManagement
    {
        Task::Task()
        {
            //modifiable zone @12366@30671900:196@T

            //modifiable zone @12366@30671900:196@E
        }

        Task::Task(const Task& value)
        {
            //modifiable zone @12378@30671900:208@T
            //TODO: write copy constructor code

            //modifiable zone @12378@30671900:208@E
        }

        Task& Task::operator =(const Task& value)
        {
            //modifiable zone @12396@30671900:226@T
            std::copy(value.getSubTask().begin(), value.getSubTask().end(), std::inserter(this.subTask, this.subTask.begin()));
            std::copy(value.getResource().begin(), value.getResource().end(),   std::inserter(this.resource, this.resource.begin()));
            this.owner = value.getOwner();
            this.name = value.getName();
            this.wbsCode = value.getWbsCode();
            //modifiable zone @12396@30671900:226@E

            //modifiable zone @12397@30671900:227@T
            return *this;
            //modifiable zone @12397@30671900:227@E
        }
        //...
    }
}
Entering class code and non-modeled class members
Modelio Cxx Designer lets you input Cxx code to be injected into the class header and body files directly in the class Cxx edition dialog box. This can be useful to initialize global variables and implement utility functions used by the class and class members, which are not relevant to the model but which need to be provided.
To enter class-level Cxx code, you simply enter it in the "Code" tab of the class Cxx edition dialog box.
The "Placement" hierarchy defines where the input code will be injected:
-
"Header" to "Top (before Class)": The class header file right before the class definition.
-
"Header" to "Class (Class Members)" to "Public": A class public member.
-
"Header" to "Class (Class Members)" to "Protected": A class protected member.
-
"Header" to "Class (Class Members)" to "Private": A class private member.
-
"Header" to "Bottom (after Class)": The class header file right after the class definition.
-
"Body" to "Top (before Class)": The class body file (*.cpp file) right before definition of class members.
-
"Body" to "Bottom (after Class)": The class body file (*.cpp file) right after definition of class members.
Therefore, to input Cxx code in the intended position in the class header or body file, you simply select the respective node in the "Areas" hierarchy and then type the code in the "Cxx" field.
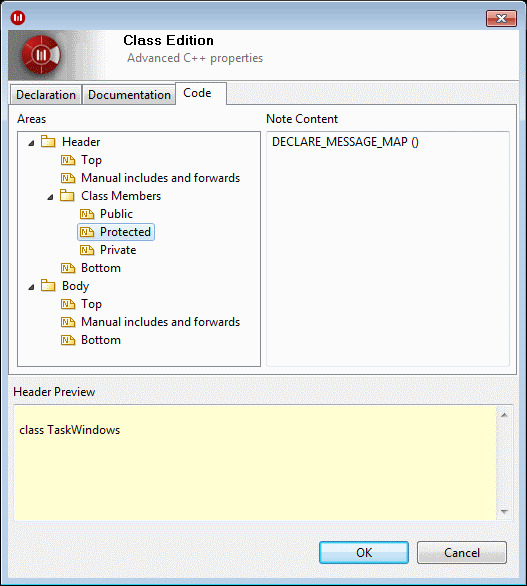
For example, we want to inject the standard MFC macro "DECLARE_MESSAGE_MAP" into the header of the "TaskWindow" class, because this class represents the specific window (and is therefore inherited from the "CWnd" class) and should intercept window messages. The macro should be injected as a protected "member" of the class.
We open the "Code" tab of the class Cxx edition dialog box, select the "Header –> Class [Class Members] –> Protected" node of the "Placement" hierarchy and type the intended code.
Modelio Cxx Designer produces the following code for the "TaskWindow" class. The code entered for the "Header –> Class [Class Members] –> Protected" node of the "Placement" tree is injected into the protected part of the class.
//includes for used library types

#include <cstringt.h>
#include <afxwin.h>
#include <afxtempl.h>
#include <afxcoll.h>

//automatic includes (friends, associated classes, etc)
#include "MyPlanner/GUI/Windows/CWnd.h"
#include "MyPlanner/GUI/ITaskView.h"
#include "MyPlanner/TaskManagement/Task.h"

namespace MyPlanner
{
    namespace GUI
    {
        namespace Windows
        {
            class TaskWindow : public CWnd, public GUI::ITaskView
            {
            //...
            private:
                CString displayTitle;

            public:
                CDC dc;

            //associations

            public:
                TaskManagement::Task* task;
                CMap<CString,CString&,CBrush,CBrush&> brushResource;

            //operations

            public:
                TaskWindow();
                TaskWindow(const TaskWindow& value);
                TaskWindow& operator =(const TaskWindow& value);
                ~TaskWindow();
                void formatDisplayTitle(std::string& FormatStr);
                CDC getDc();
                afx_msg int OnCreate(CREATESTRUCT* lpCreateStruct);
                const CArray<CDC,const CDC&>& getAttr1() const;


            //non-modeled members

            protected:

            //modifiable zone @16224@30671900:2404@T
                DECLARE_MESSAGE_MAP()
            //modifiable zone @16224@30671900:2404@E
            };
        }
    }
}
Editing code in Modelio
The  "Edit header" and
  "Edit body" buttons are available for packages, classes, interfaces and operations.
For operations, the "Edit header" button opens the header of the owner class, and the "Edit body" button opens the body file of the owner file.
To edit Cxx code in an editor, you simply select a model element and click on the "Edit header" or "Edit body" buttons in the "Cxx" property view.
The editor containing the header or the body file contents is then opened. You can write implementation code in the editor, between markers. Save the editor to transfer the input code back into the model.
Note: You may prefer to input implementation code in an external editor that you can specify via the "External editor" Modelio Cxx Designer settings. The model is then updated when you close this editor.
Updating externally modified code
You can modify the application code outside the Modelio environment, for example, by editing it in your favorite IDE. Modelio Cxx Designer lets you update the code notes belonging to model elements from externally modified code.
To update the code notes attached to a model element, just click on the  "Update" button in the "Cxx" property view.
Modelio Cxx Designer reads the file (where the element’s code "lives") and transfers the code between markers back into the respective notes.
Note: Only the code entered between markers generated by Modelio Cxx Designer can be transferred back into the model. Any code input outside these markers is ignored!