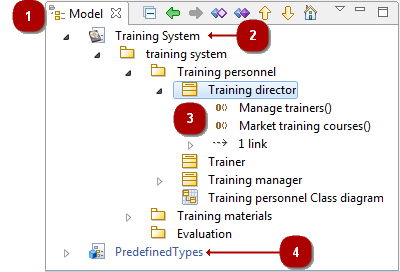
Key :
-
Model explorer tab.
-
Local work model.
-
Model elements.
-
Deployed model component (local library)
Main Model explorer commands
From the explorer contextual menu:
-
Create a diagram or a matrix [
 – Create a diagram or matrix…] : Launch a creation wizard to create a diagram or a matrix of your choice (see Creating a diagram for more details)…
 -
Create an element [
 – Create element] : Creates the element of your choice under the selected element.
 -
Add stereotype(s) on an element [
 – Add stereotype(s)…] : Adds one or several stereotypes to the selected element.
 -
Create a stereotype [
 – Create stereotype…] : Creates a new stereotype (see Basic level – Creating a stereotype for more details).
 -
Delete an element [
 – Delete element / Del key] : Deletes the selected element.
 -
Cut an element [
 – Cut element / Ctrl+X key] : Cuts the selected element.
 -
Copy an element [
 – Copy element / Ctrl+C key] : Copies the selected element.
 -
Paste an element [
 – Paste element / Ctrl+V key] : Pastes the copied element.
 -
Launch a macro [
 – Macros] : Launches a chosen macro (see Macros catalog for more details)…
 -
Create/Edit/Export/Launch a Pattern [
 – Patterns] : Create/Edit/Export or launches a Pattern.
 -
Check model consistency [
 – Check model] : Checks model consistency recursively from the selected element.
 -
Launch an XMI Import/Export [
 – XMI] : Launches an XMI Import/Export recursively from the selected element (see Modelio XMI Import/Export for more details)…
 -
Create/edit/package a Model component [
 – Model Components] : Creates, edits or packages a Model Component (see Developing and packaging model components for more details)…
 -
Import a model [
 ] : Launches a model import (see Importing elements from existing projects for more details)…
From the explorer toolbar:
-
Collapse all [
 ] : Collapses all elements and shows only the root package.
 -
Skip back [
 ] : Skips back through the history of the elements you have selected.
 -
Skip forward [
 ] : Skips forward through the history of the elements you have selected.
 -
Open new explorer [
 ] : Opens a new explorer whose root element is the selected element.
 -
Create sibling element [
 ] : Creates a sibling element of the selected element. Sibling elements are elements of the same type as the selected element and at the same level in the model hierarchy.
 -
Create clone [
 ] : Creates a clone of the selected element. Clones are exact copies of their origin elements. They have the same properties and the same contents.
 -
Move up [
 ] : Moves the selected element up in the model structure.
 -
Move down [
 ] : Moves the selected element down in the model structure.
 -
Select as root [
 ] : Displays only the selected element and its contents. Click again to switch back to the classic view.
Note: For more information, see "Creating elements using the context menu commands".